Part 3: Deploying K3s and Updating Traefik
In part 3 of getting things up and going, we’ll be covering how to get K3s installed on all of your nodes, getting Docker Hub set up, upgrading and configuring Traefik on K3s using Lens, and Associating a firewall with your Digital Ocean droplet.
Software Requirements
- Download and install Lens on your system. It’s available on Mac/Windows/Linux, so you shouldn’t run into any major compatibility issues. We’ll leverage this to update and monitor stats on your K3s cluster.
- Ensure that kubectl is installed on your system. It will be required to continue.
Assumptions
- You have existing rudimentary knowledge of Linux and the command line
- You know how to use SCP to copy remote files locally
- Your Raspberry Pi’s are running HypriotOS
- You have basic awareness of what Helm v3 is
- You’ve already set up ZeroTier on your Digital Ocean node after following through part 2 of this guide
- You’ve migrated a domain to Digital Ocean
Deploying K3s
While I have already automated the vast majority of this (or leveraged existing automation code), that code will be available at a later date. For now, let’s step all the way through the deployment manually.
For each of your K3s nodes, you’ll want to run the following commands:
# Set Global Sysctl Values
sudo sysctl net.ipv4.ip_forward=1
sudo sysctl net.ipv6.conf.all.forwarding=1
sudo sed -i 's/#net.ipv4.ip_forward=1/net.ipv4.ip_forward=1/g' /etc/sysctl.conf
sudo sed -i 's/#net.ipv6.conf.all.forwarding=1/net.ipv6.conf.all.forwarding=1/g' /etc/sysctl.conf
For your Raspberry Pi (arm/linux/v7 or arm64) K3s nodes, you’ll need to run:
# Download the k3s binary
sudo wget https://github.com/rancher/k3s/releases/download/v1.18.9%2Bk3s1/k3s-arm64 -O /usr/local/bin/k3s
sudo chmod a+x /usr/local/bin/k3s
For your Digital Ocean (amd64) K3s node, you’ll need to run:
# Download the k3s binary
sudo wget https://github.com/rancher/k3s/releases/download/v1.18.9%2Bk3s1/k3s -O /usr/local/bin/k3s
sudo chmod a+x /usr/local/bin/k3s
This can be scripted for your Raspberry Pi nodes with bash by doing something like this:
for i in 10.45.0.{41..44}; do ssh pirate@$i -t "sudo sysctl net.ipv4.ip_forward=1 \
  && sudo sysctl net.ipv6.conf.all.forwarding=1 \
  && sudo sed -i 's/#net.ipv4.ip_forward=1/net.ipv4.ip_forward=1/g' /etc/sysctl.conf \
  && sudo sed -i 's/#net.ipv6.conf.all.forwarding=1/net.ipv6.conf.all.forwarding=1/g' /etc/sysctl.conf \
  && sudo wget https://github.com/rancher/k3s/releases/download/v1.18.9%2Bk3s1/k3s-armhf -O /usr/local/bin/k3s \
  && sudo chmod a+x /usr/local/bin/k3s \
  && sudo reboot"; done
For your amd64 Digital Ocean droplet, you can simply strip the -armhf off the end of the wget URL above and run the same code.
Just trying to keep it easy 😉
Deploying the K3s Main Node
Start out by SSHing to the node you intend to be the master. We’re going to run the following commands:
# Escalate to root
sudo su

# k3s.service file taken from here:
# https://github.com/geerlingguy/k3s-ansible/blob/master/roles/k3s/master/templates/k3s.service.j2
cat << EOT > /etc/systemd/system/k3s.service
[Unit]
Description=Lightweight Kubernetes
Documentation=https://k3s.io
After=network-online.target

[Service]
Type=notify
ExecStartPre=-/sbin/modprobe br_netfilter
ExecStartPre=-/sbin/modprobe overlay
ExecStart=/usr/local/bin/k3s server
KillMode=process
Delegate=yes
# Having non-zero Limit*s causes performance problems due to accounting overhead
# in the kernel. We recommend using cgroups to do container-local accounting.
LimitNOFILE=1048576
LimitNPROC=infinity
LimitCORE=infinity
TasksMax=infinity
TimeoutStartSec=0
Restart=always
RestartSec=5s

[Install]
WantedBy=multi-user.target
EOT
# Ensure the systemd file has the correct permissions
chmod 0644 /etc/systemd/system/k3s.service

# Make sure we reload the systemctl daemon, then enable and start it.
systemctl daemon-reload
systemctl enable k3s
systemctl start k3s

# Drop out of root
exit

# Run the next command until it finishes successfully. This may take up to 30 seconds.
stat /var/lib/rancher/k3s/server

# After the stat command above succeeds, run the following commands
mkdir -p /home/pirate/.kube/
sudo cp /etc/rancher/k3s/k3s.yaml /home/pirate/.kube/config
sudo chown pirate:pirate /home/pirate/.kube/config

# Change the server from localhost (127.0.0.1) to the IP address of the eth0 interface
sudo k3s kubectl config set-cluster default \
      --server=https://$(ip a show eth0 | grep -Po 'inet \K[\d.]+'):6443 \
      --kubeconfig /home/pirate/.kube/config

# Output the authentication token for our worker nodes; we'll need this later
sudo cat /var/lib/rancher/k3s/server/token
After a few moments, your k3s master node should be up and running! You can get the Kube config file by copying it locally out of /home/pirate/.kube/config with SCP or however you best see fit.
Make sure that you make a note of the token above, we’ll need it in just a moment for the worker nodes!
Deploying the K3s Pi Worker Nodes
Joining the nodes is much easier. You’ll need to set two variables below, and everything else should be nearly seamless.
# Escalate to root
sudo su

# You MUST make sure to set the variables below before continuing
AUTHTOKEN="AuthTokenFromAbove"
MASTER_IP="Your.Master.Node.IP"

# k3s-node.service file taken from here:
# https://github.com/geerlingguy/k3s-ansible/blob/master/roles/k3s/node/templates/k3s.service.j2
cat << EOT > /etc/systemd/system/k3s-node.service
[Unit]
Description=Lightweight Kubernetes
Documentation=https://k3s.io
After=network-online.target

[Service]
Type=notify
ExecStartPre=-/sbin/modprobe br_netfilter
ExecStartPre=-/sbin/modprobe overlay
ExecStart=/usr/local/bin/k3s agent --server https://$MASTER_IP:6443 --token $AUTHTOKEN
KillMode=process
Delegate=yes
# Having non-zero Limit*s causes performance problems due to accounting overhead
# in the kernel. We recommend using cgroups to do container-local accounting.
LimitNOFILE=1048576
LimitNPROC=infinity
LimitCORE=infinity
TasksMax=infinity
TimeoutStartSec=0
Restart=always
RestartSec=5s

[Install]
WantedBy=multi-user.target
EOT

# Make sure we reload the systemctl daemon, then enable and start it.
systemctl daemon-reload
systemctl enable k3s-node
systemctl start k3s-node

# Drop out of root
exit
At this point, all of your Raspberry Pi K3s nodes should be up and operational! I recommend confirming this by using Lens or K9s on your local system.
Deploying the K3s DO Worker Node
For the Digital Ocean worker node, it’s almost exactly like joining the Pi nodes. However, since we need this one to dial home over the ZeroTier network, we’ve made a couple additions below. Specifically, we must specify the flannel-iface argument in the service file with the ZeroTier interface name.
# Escalate to root
sudo su

# You MUST make sure to set the variables below before continuing
AUTHTOKEN="AuthTokenFromAbove"
MASTER_IP="Your.Master.Node.IP"

# Flannel Interface must be set so that we can dial traffic across the ZeroTier tunnel correctly.
# Otherwise, things just won't work correctly!
FLANNEL_IFACE="$(ip l | grep 'zt' | awk '{print substr($2,1,length($2)-1)}')"
# k3s-node.service file taken from here:
# https://github.com/geerlingguy/k3s-ansible/blob/master/roles/k3s/node/templates/k3s.service.j2
cat << EOT >> /etc/systemd/system/k3s-node.service
[Unit]
Description=Lightweight Kubernetes
Documentation=https://k3s.io
After=network-online.target

[Service]
Type=notify
ExecStartPre=-/sbin/modprobe br_netfilter
ExecStartPre=-/sbin/modprobe overlay
ExecStart=/usr/local/bin/k3s agent --server https://$MASTER_IP:6443 --flannel-iface $FLANNEL_IFACE --token $AUTHTOKEN
KillMode=process
Delegate=yes
# Having non-zero Limit*s causes performance problems due to accounting overhead
# in the kernel. We recommend using cgroups to do container-local accounting.
LimitNOFILE=1048576
LimitNPROC=infinity
LimitCORE=infinity
TasksMax=infinity
TimeoutStartSec=0
Restart=always
RestartSec=5s

[Install]
WantedBy=multi-user.target
EOT

# Make sure we reload the systemctl daemon, then enable and start it.
systemctl daemon-reload
systemctl enable k3s-node
systemctl start k3s-node

# Drop out of root
exit
At this point, all of your Kubernetes nodes should be up and operational! Again, you should verify this using Lens, K9s, or by simply running kubectl get nodes on your local system.
➜  personal-website git:(p3-k3s-do-zt-go) ✗ kubectl get nodes -owide
NAME         STATUS   ROLES    AGE   VERSION        INTERNAL-IP     EXTERNAL-IP   OS-IMAGE                         KERNEL-VERSION       CONTAINER-RUNTIME
k3s-master   Ready    master   24d   v1.18.9+k3s1   10.45.0.41      <none>        Raspbian GNU/Linux 10 (buster)   5.4.51-v7+           containerd://1.3.3-k3s2
k3s-node1    Ready    <none>   24d   v1.18.9+k3s1   10.45.0.42      <none>        Raspbian GNU/Linux 10 (buster)   5.4.51-v7+           containerd://1.3.3-k3s2
k3s-do-1     Ready    <none>   12d   v1.18.9+k3s1   172.22.108.69   <none>        Ubuntu 18.04.5 LTS               4.15.0-118-generic   containerd://1.3.3-k3s2
k3s-node3    Ready    <none>   24d   v1.18.9+k3s1   10.45.0.44      <none>        Raspbian GNU/Linux 10 (buster)   5.4.51-v7+           containerd://1.3.3-k3s2
k3s-node2    Ready    <none>   24d   v1.18.9+k3s1   10.45.0.43      <none>        Raspbian GNU/Linux 10 (buster)   5.4.51-v7+           containerd://1.3.3-k3s2
Generating a Digital Ocean API key
Log into the Digital Ocean Console, navigate to your project containing the Domain, and navigate Account > API on the left-hand side of the screen.
Click Generate New Token and make sure to check Read and Write.
Make sure to copy and save the token right now. It will not be displayed or accessible again. If you lose this, you will need to delete and re-create the token.
Updating Traefik on K3s
In order to automatically have Traefik generate LetsEncrypt certificates and authenticate them, we’re going to integrate it with Digital Ocean for ACME authentication.
We’ll need to do two things when updating Traefik:
- Create a
secretwith the Digital Ocean API token - Use Lens to update the Traefik Helm Chart
- Edit the Traefik
deploymentto mount the secret as a volume
Creating the Digital Ocean secret for Traefik
First, we’ll need to add the secret.
# Set the Digital Ocean Token from the previous section.
DO_AUTH_TOKEN="PutYourTokenHereDontUseThisOne"

# Here we are creating the secret; we're going to ensure the correct formatting with the echo/base64 combination below.
cat <<EOF | kubectl apply -f -
apiVersion: v1
kind: Secret
type: Opaque
metadata:
  name: do-auth-token
  namespace: kube-system
  labels:
    app: traefik
data:
  DO_AUTH_TOKEN: $(echo -n "$DO_AUTH_TOKEN" | base64 -w0)
EOF
Updating the Traefik Helm Chart
Open Lens and make sure you can connect to your K3s Cluster.
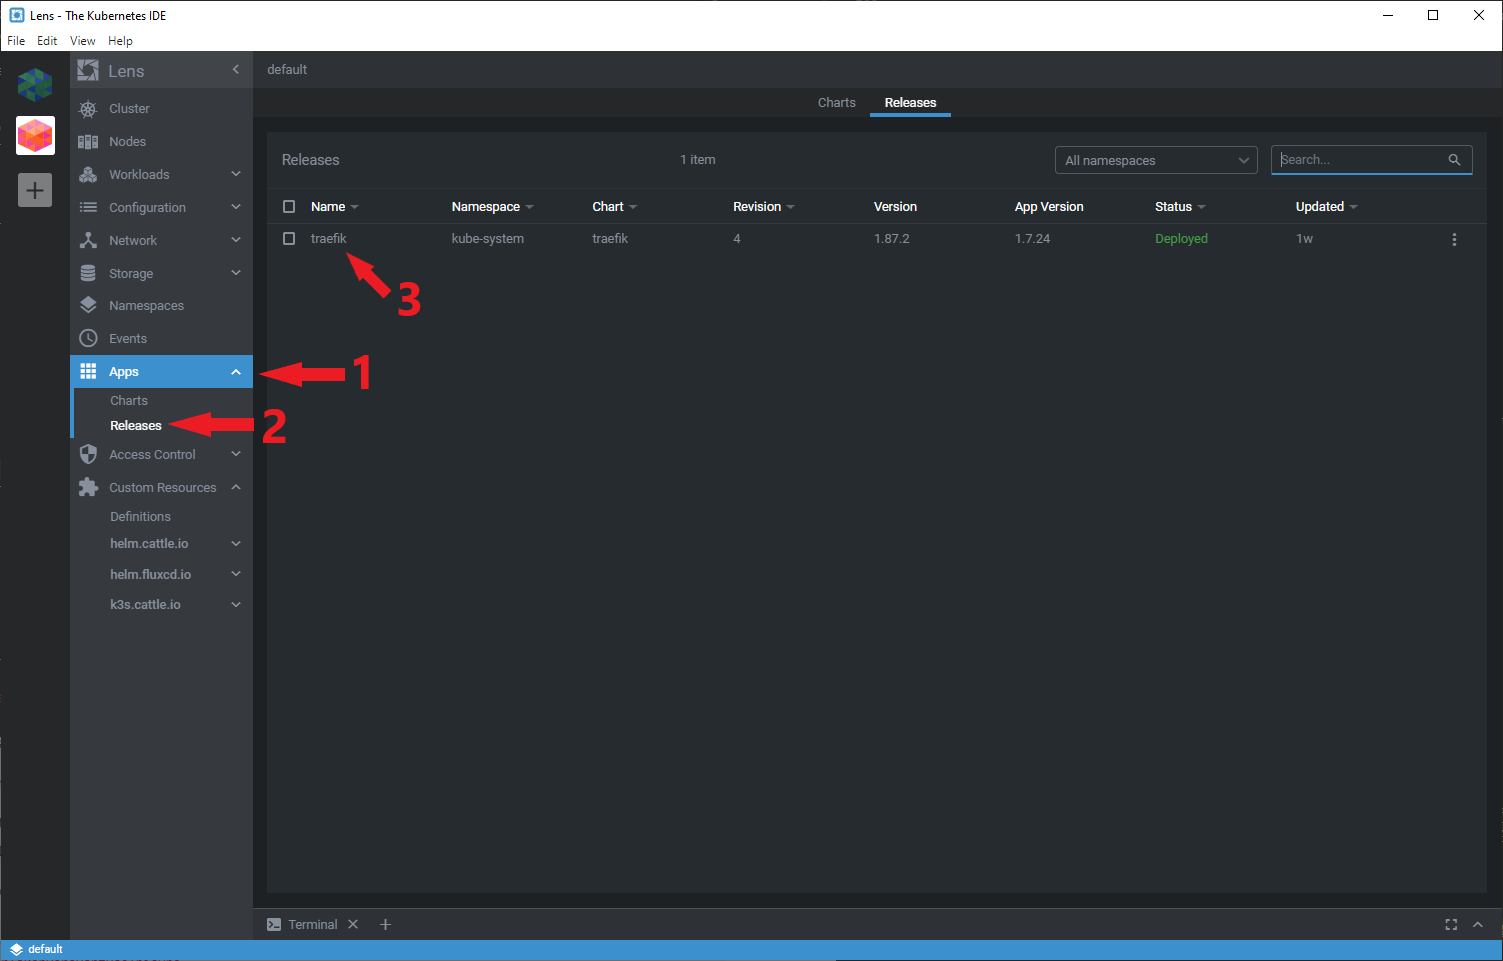
Navigate to Apps > Releases on the left hand side. Then click on traefik.
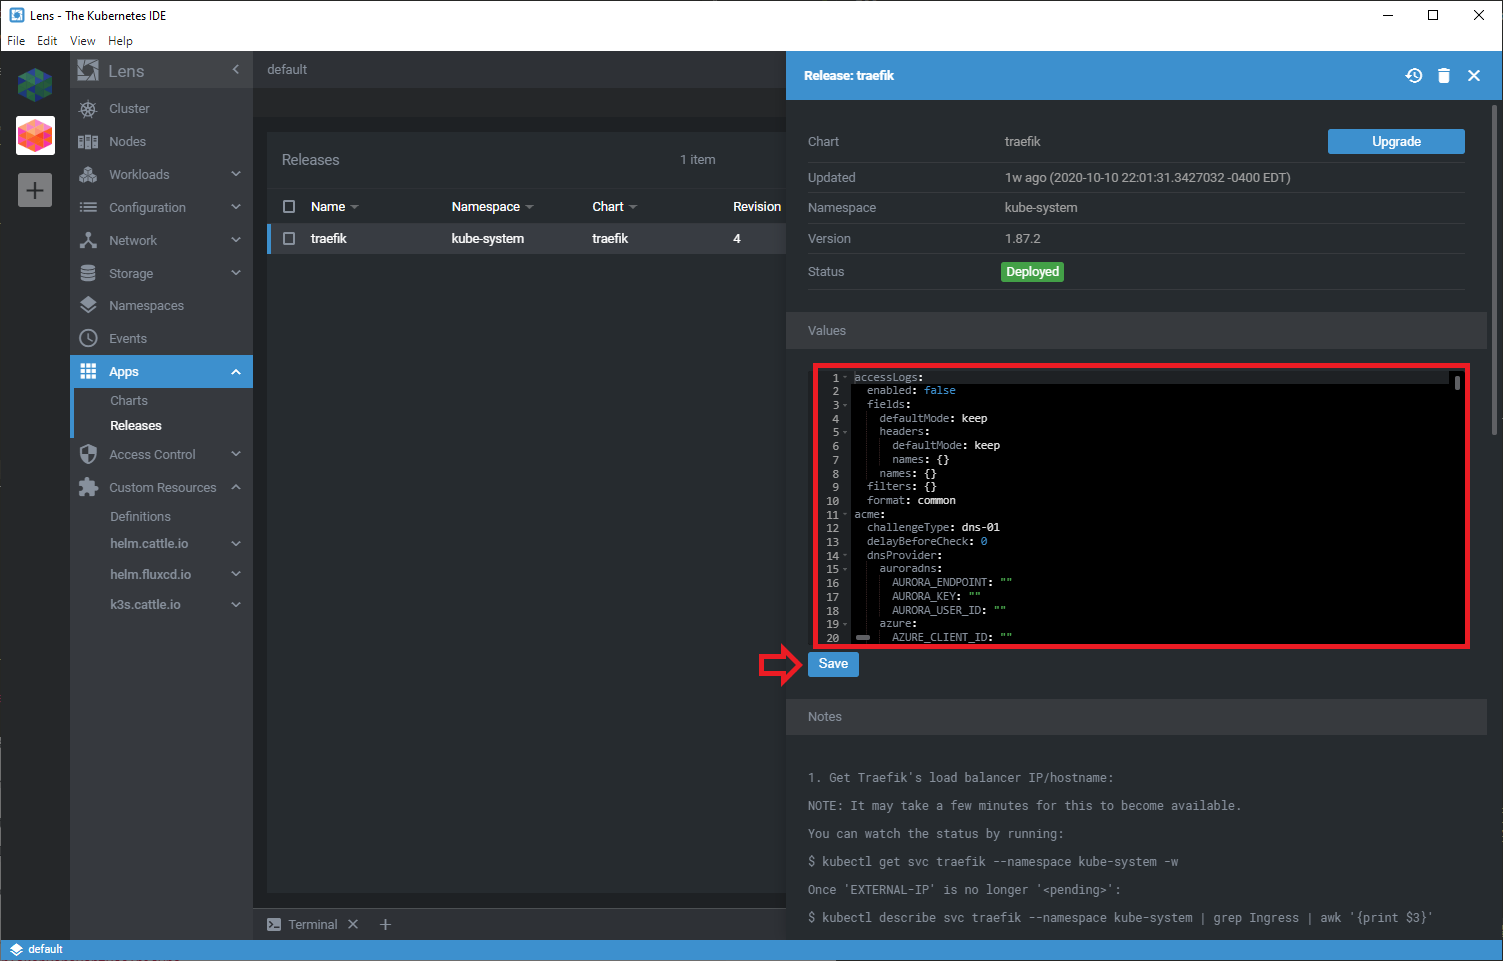
Here you will be able to update the Helm chart for traefik on your k3s cluster. You will need to make the following changes:
acme:
  challengeType: dns-01
  delayBeforeCheck: 0
  dnsProvider:
    digitalocean:
      DO_AUTH_TOKEN: PutYourTokenHereDontUseThisOne
  email: your.email.address@domain.com
  enabled: true
  httpChallenge:
    entrypoint: http
  keyType: RSA4096
  onHostRule: true
  persistence:
    accessMode: ReadWriteOnce
    annotations: {}
    enabled: true
    size: 1Gi
  resolvers: []
  staging: false
Please note that the DO_AUTH_TOKEN value must be replaced with the key from before. Several fields may already match the contents above; don’t worry about it in that case.
Once your modifications are complete, go ahead and click Save to make the changes persistent.
Updating the Traefik Deployment
Finally, we need to edit the traefik deployment. You’ll need to make the following modifications:
spec:
  template:
    spec:
      containers:
        - name: traefik
          env:
            - name: DO_AUTH_TOKEN
              valueFrom:
                secretKeyRef:
                  name: do-auth-token
                  key: DO_AUTH_TOKEN
Once that’s all complete, you should be able to see Traefik replace the pod with the newly edited deployment.
Congratulations! You’ve successfully deployed K3s on both Raspberry Pi (arm) as well as Digital Ocean Droplets (amd64), and we’re ready to get a GitOps workflow and some applications up and going!
What’s coming up
In part 4, I’ll be covering:
- Generating your Docker Hub API Key
- Creating your K3s GitHub Infrastructure Repository
- Deploying FluxCD
- Adding Flux Deploy Keys to your K3s repo
- Setting up your Website’s GitHub Repo
- Creating GitHub Actions to build and push a docker container
- Adding Secrets to your GitHub Repo for the GitHub Actions
- …and More!
Helpful Links & References
- kubectl - Install and Set Up kubectl
- Rancher - rancher/k3s on GitHub
- Digital Ocean - How to Create a Personal Access Token
- Rancher - k3s-ansible Deployment
Questions? Thoughts?
Feel free to ping me at daniel.a.manners@gmail.com. If something I wrote isn’t clear, feel free to ask me a question or tell me to update it!