Homelab Updates - Summer 2020
Homelab Updates - Summer 2020
In June of 2020, I decided to build a new homelab. The goals were simple: open source all of the code, give back to the community, and make sure that as much as humanly possible was automated. Ultimately: Could I build a codebase which allowed someone who wasn’t me to spin up a similar environment rapidly? Or, if my system burned to the ground, could I re-deploy everything within a reasonable timeframe with only the loss of persistent data?
What happened to the old homelab environment
Quick backstory: I sold my last full homelab around September 2019. There were several reasons for that decision:
- The cost of power and air conditioning began to outweigh the benefits of running it all, when I was simply not using it anywhere near its potential.
- I was running the whole house network through it. Whenever something broke and I was not home, that meant my wife was without internet while running her business from home.
- I no longer needed the lab environment I once did for personal learning, as the technology stack I was using on a daily basis was something I was familiar with and something that I could learn on during work hours.
- I was not using it to learn anything new.
The combination of those reasons (and more) ultimately pushed me towards selling it and abandoning my previous homelab dreams. It was so much fun while it lasted, but it simply stopped making sense.
Why the major change between the original homelab cluster and the new single-system setup?
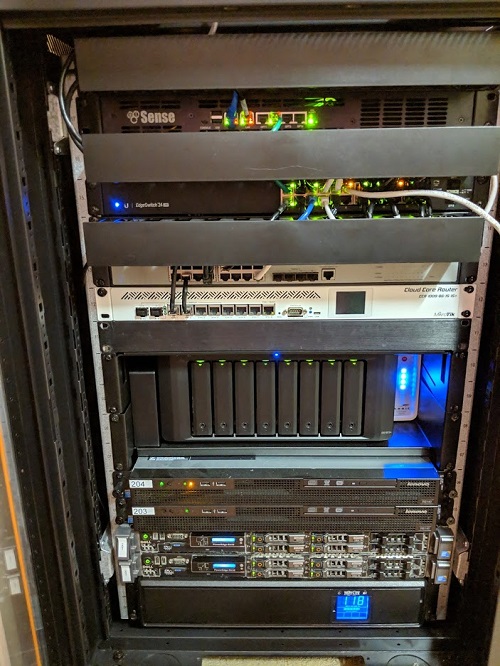
There were a few major issues with the original homelab rack that I wanted to fix in version 2:
- It was physically enormous; an 18U 39"-deep rack takes up an extraordinary amount of floorspace.
- It generated a lot of heat; the combined 6 servers, storage array, switching, and dedicated router hardware simply used a lot of power and output tons of heat.
- It was expensive. Granted, I built it over about 3 years, it was between $5k-6k in hardware cost.
- It was unbelievably complicated. If it all burned down and I wanted to replace it, the time it would take to get everything back up would have been a few weekends worth of free time.
Those issues gave me three good goals for version 2:
- Shrink the footprint dramatically.
- Make it cool and quiet.
- Make it simple.
What does the new homelab look like, and why now?
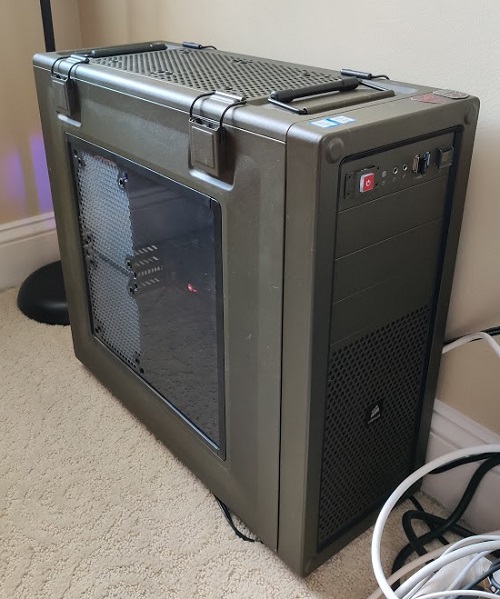
I was able to re-purpose my Gaming PC and set it up as a Proxmox 6.2 hypervisor. The hardware specs for the new homelab are:
Motherboard: "Asus MAXIMUS VIII HERO"
Processor: "Intel i7-7700 (4c8t, 4.2GHz)"
RAM: "64GB (4x Corsair 16GB DDR4-2400), Non-ECC"
Storage:
    - Disk1: "256GB M.2 SSD Western Digital Blue"
      Alias: "hypervisor"
    - Disk2: "500GB M.2 SSD Crucial"
      Alias: "fivehundo"
    - Disk3: "1TB M.2 NVME Western Digital Blue"
      Alias: "nvmestor"
    - Disk4: "2TB SATA 7200rpm Seagate 3.5"
      Alias: "slowboat"
The reason I am re-building the homelab anyway is becuase of my new role with Cisco as a DevOps Engineer. With all of the new tooling and logic that I’m working with at Cisco, I felt it was time again to build a homelab that would allow me to better learn and develop on the same or similar tooling as I work on with Cisco.
With that in mind, I have written my entire homelab-deployment project with Puppet Bolt. While many people may have familiarity with Puppet, Bolt is more of an ad-hoc software piece and is effectively Puppets answer to Ansible. While I had built thousands of lines of Ansible in the past, I had not messed around with Puppet too much.
Why Puppet Bolt?
Puppet Bolt is what I have been writing much of my Cisco code for, and in order to have a better understanding of it, I figured what better way than to deploy my entire homelab with it? One caveat that I found is that while learning Puppet/Puppet Bolt, much of the documentation is more reference material rather than examples. Because so much Puppet and Bolt code is normally incredibly environment specific, it does not appear that many people have released a lot of perfectly functional code as example code. Since I had such a frustrating time picking it up with the speed necessary to my job, I figured I would aim to 100% release my source code for my entire Homelab.
What can it do?
Currently, it runs the following applications:
- Traditional VM:
- Router (NGINX/iptables/BIRD)
- Gitlab: [https://gitlab.goodmannershosting.com]
- Pi-Hole
- NFS Server (For Kubernetes)
- Kubernetes (1 Primary, 3 Nodes)
- Kubernetes Applications
- Nexus OSS: [https://nexus.goodmannershosting.com]
- Jenkins: [https://jenkins.goodmannershosting.com]
- SonarQube: [https://sonarqube.goodmannershosting.com]
- PostgreSQL
How do you deploy it all?
I have most of a live document up on the Github project for homelab-deployment, but here’s a TL;DR of that document:
- Install the Hypervisor on your hardware.
- Configure a GenericCloud VM Template (More on that below)
- Install Puppet Bolt on your development machine.
- Run the following Bolt Plans, in this order:
deploy_applications::qemu_guest_agentdeploy_applications::docker_installdeploy_router::router_configdeploy_router::birddeploy_applications::pi_holedeploy_applications::gitlab_cedeploy_applications::gitlab_runnerdeploy_nfs::provision_diskdeploy_nfs::setupdeploy_nfs::add_dir newdir=nvemestor mount=jenkinsdeploy_nfs::add_dir newdir=nvemestor mount=nexusdeploy_nfs::add_dir newdir=nvemestor mount=sonarqubedeploy_nfs::add_dir newdir=nvemestor mount=postgresdeploy_k8s::init_masterdeploy_k8s::init_workersdeploy_router::google_dyndnsdeploy_router::nginx
- Once the Kubernetes Cluster is up and going, you can run the following
kubectlcommands to spin up all of the applications:kubectl apply -f kubernetes/manifests/metallb/metallb-config.yamlkubectl apply -f kubernetes/manifests/postgres/postgres-secret.yamlkubectl apply -f kubernetes/manifests/postgres/postgres.yamlkubectl apply -f kubernetes/manifests/nexus.yamlkubectl apply -f kubernetes/manifests/jenkins-ce
- Go ahead and configure Nexus OSS.
- Create the Docker Registry, a user account, and an associated role.
- Build, tag, login and push up the postgres management container to Nexus. This will also serve as validation testing.
docker build -t manage_psql Boltdir/site-modules/manage_psql/files/createdocker tag manage_psql nexus.goodmannershosting.com:5001/repository/homelab/manage_psqldocker login nexus.goodmannershosting.com:5001docker push nexus.goodmannershosting.com:5001/repository/homelab/manage_psql
- Once you have validated the authentication above, update the proper file (k8s-nexus-auth.yaml), and push it to Kubernetes.
kubectl apply -f kubernetes/manifests/k8s-nexus-auth.yaml
- If everything else has succeeded, you will be able to also push up and successfully launch Sonarqube.
kubectl apply -f kubernetes/manifests/sonarqube/sonar-postgres-add.yamlkubectl apply -f kubernetes/manifests/sonarqube/sonarqube.yaml
Configuring Generic Cloud Images
Since there did not appear to be anything like it, and I figured it would be a good learning experience, I built a puppet module to control Proxmox. While this is still very much a work-in-progress, it allows two major functions to be automated that can otherwise be annoying:
- Simply creates VM Templates based on Generic Cloud Images (tested with Ubuntu and CentOS)
- Simply clone template VM’s and assign the correct values for hardware specifications and network settings using Cloud-Init.
What now?
There is still a lot to do, and I am sure that good chunks of the above can be automated. The goals of this project are really to better understand and learn Puppet Bolt while also providing the community a better place to start learning.